Preparing Your Hives for Winter
Temperatures are dropping and winter is looming. Winter preparations should be in place by now, but it is not too late to help your hive through winter if have been procrastinating. Below is a checklist of the basics. As you review this list, remember that beekeeping is highly local, so not all items will apply to your apiary:
External Protection: Starting at the top, you can improve hive shelter from rain and snow by placing an oversize piece of plywood on the telescoping cover. Better still, shim one end of the plywood to create a slope to drain the water away from the hive. Place a brick or rock on top to prevent it blowing away in a storm.

If your hive is exposed to winds, consider protecting it from prevailing winds with something like straw bales. Bales can also act as a heat mass to absorb the sun’s heat and release it later in the day.

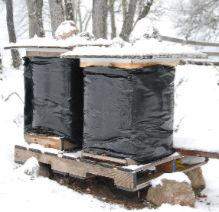
We get lots of questions about hive wraps. If done right, hive wraps can be beneficial. Again, moisture is the challenge. Most wraps trap moisture, so having a moisture wick at the top of the hive is especially important. Notably, commercial beekeepers in cold climates often use tar paper as a wrap. This is an effective and relatively cheap wrap solution. Make sure the wrap does not channel rain toward the hive. The oversized plywood mentioned above will help prevent this.

If you happen to have a garden shed with available space, consider placing the hives in the shed with an exterior access hole. Another alternative is to put up a three sided bee shed whose open side faces the sun.
Hive Entrance: Reducing the hive entrance to around one inch protects the colony from prevailing winds and helps defend from robbing bees and yellow jackets. But remember to check the entrance after a sudden cold snap, as it is common to have a high attrition after a sudden freeze. The resulting dead bees can block the entrance, thereby trapping the colony from taking a voiding flight, which results in them fouling the hive. This, along with the stink of rotting dead bees, creates a very unhealthy hive. If necessary, fish out the dead bees with a wire coat hook. Another option is to have a small top entrance as a safety exit. We find that bees prefer the top entrance in winter, presumably because it is a easier for them than travelling to the bottom of the hive. However, top entrances do leak heat, making them somewhat controversial. If you do opt for a top entrance, keep it small and put an awning over it to reduce drafts.
Insulation: Insulation is helpful as long as it does not become a moisture trap. Like houses, hives lose a lot of heat at the top, so insulating above the inner cover is a good move, but you don't want the insulation to trap the moisture. Moisture generated by the colony moves up with the warm air. Therefore, ideally, your top insulation should have moisture wicking properties. Materials such as wood shavings, washed sheep wool, and burlap can do this. Our approach is to use a Vivaldi Board™️ to both insulate and wick moisture at the top of the hive. We use either burlap or pine shavings from our shop. Burlap is more convenient but less insulative than pine shavings.

Hive Location: If you have been thinking of moving your hive to a sunnier spot, this is a good time to do it. The bees are flying much less now, and the extra sun can really help a struggling colony.
Feeding: Check you hive weight regularly to see how their food storage is holding up. Winter feeding is best done in the form of a "dry" mix of some sort. This can take the form of Drivert sugar, or fondant, or a candy board. You can add a little pollen substitute powder to the sugar.
Fondant and candy boards go directly above the frames. Depending on the size of your inner cover, fondants can often be used without a spacer shim. You just flip your inner cover so the tall side is down, and place a patty on the frames in the center so it is above the cluster. Candy boards generally require a spacer shim. If you have a Vivaldi Board™️, you can feed Drivert dry (without mixing to make a fondant) by pouring it through the mesh of the Vivaldi Screen™️. Make sure to insulate above the Vivaldi Screen to keep the feeding area warm.
Mite Trays and Hive Stands: A perennial and controversial question is, do I remove the mite tray (sticky board) from the screened bottom board for winter to improve hive ventilation? We prefer to leave it in. First, the volume of air throughput in winter hive is very small, and is easily accommodated by the front entrance. Second, in wet locations, the ground is continually releasing moisture. The mite tray presents a barrier to this dampness, particularly if you have a hive stand that raises the hive at least a foot of the ground so that air can circulate underneath. However, we recommend cleaning the mite tray periodically in winter as detritus can accumulate.
Winter Mite Treatment: One of the most valuable things you can do to help your bees through winter is to treat them for mites in August/September. If you did not treat, don't despair. You can still test and treat, but you have to be more careful how you go about it.
Opening a hive up in winter to do mite testing is not a good idea, but you can use your mite tray (sticky board), which is not as accurate but better than not testing. If your mite count is high, oxalic acid vaporization is a good choice. You don't have to open the hive to do the treatment. And the fact that it is relatively ineffective against brood mites doesn't matter as there is minimal or no brood.

Wrap-up: Winter colony survival can be challenging. Remember, even the best beekeepers lose winter colonies, but we hope the above suggestions tip the balance in your favor. Good luck!