Getting Started in Beekeeping: Part 1
Share
Pre Season
Getting Your Bees: Before you spend money on a beehive and equipment, you need to line up some bees. You can get these three different ways: as a swarm, a package of bees, or a nucleus colony. Swarms are great for experienced beekeepers, but we don’t recommend starting beekeeping by trying to catch a swarm. Package bees are similar to a swarm in that there is a cluster of about 10,000 bees and a queen. The queen is mated but not laying because there is not comb to lay in, and she is caged to isolate her from the rest of the bees. This is because she is new to those bees, and they might decide to kill her until they have decided to accept her. We have observed over the decades that the installation success rate of package bee is lower than that of a nucleus colony. This used to be reflected in a much lower price. However, the price gap between a package of bees and a nucleus colony has narrowed significantly, which is why the nucleus colony is the option we prefer.
Nucleus colony: Unlike a swarm or package bees, the colony is already fully functioning, with a laying queen and brood. The colony comes in a waxed cardboard box that contains 5 deep frames. Two or more of these frames will have brood in one of three stages (eggs, larvae and pupae). Additionally, it will have 5-10 thousand bees. Don’t worry about this wide range; there will be thousands of brood cells developing into bees. The nucleus colony we offer will be a hybrid race, bred by an Oregon based commercial beekeeper. The nucleus colonies typically arrive in the spring (April), and can be preordered as early as December or January.
Hive and Equipment: With the bees ordered, you can now focus on the hive and equipment you will need. There are many types of hive available, with their proponents making often spurious claims about how their hive is best for the bees and will help them survive. In truth, the hive is not the most important factor in keeping bees alive, as long as it meets the basic needs of a colony: dry shelter, protection from harsh weather, expansion room, abundant forage and water, a clean and pest-free environment. This is a tall order, much of it outside the immediate control of the beekeeper. Beekeeping is challenging, and it helps to have support from neighboring beekeepers or local bee clubs. This is why we recommend starting with a Langstroth hive. This type of hive is by far the most ubiquitous, most widely supported, and cost effective. The ubiquity means you can most easily get practical support from the local community of beekeepers and purchase supplies that will fit your hive at a reasonable price. The following is a breakdown of a standard Langstroth beehive from bottom to top, and some equipment you will either need or find useful.
The Hive
Hive Placement: In the Willamette Valley of Oregon, select a site that has plenty of exposure to sun. Bees do not thrive in cool, damp, and shady environments such as a ravine or stream that is enclosed by hills. The cool damp air accumulates in these pockets, and the bees hate it. Some beekeepers are concerned about excessive sun in the summer. This is a valid concern, and can be easily managed by placing cover such as a piece of plywood on the hive to add shade. If your hive is east of the Cascade Mountain Range, you could place your hive in partial shade among deciduous trees to allow winter light and summer shade. Shelter from wind is another consideration. The wind can suck a lot of heat from a hive, so consider some sort of wind break such as bales of straw, a bush, etc.
Hive Stand: Hive stands separate the hive from the ground. We sell hive stands, but if you want to save some money, you can make your own using cinder blocks, pallets, etc. They need to be stable, carry several hundred pounds of weight, and at least 12” off the ground. Keep in mind, ants can be a problem. Some people create defenses by using tuna cans on the legs full of oil (google will have more ideas). Once your hive is established, and if ants do become a problem, it will be harder to move the hive or get rid of them.
Bottom Board: The bottom board caps the bottom of the hive, It rests on the hive stand, and acts as the main access for the flying bees. Most hives have one of two types: Solid Bottom Board or a Screened Bottom Board. The solid bottom board is traditional and provides good protection year round. It is less expensive and is used extensively by commercial beekeepers. Its main limitation is that it does not provide the varroa mite management of the screened bottom board. If you are on a budget or are just setting up a bait hive, the solid bottom board is fine. Otherwise, we recommend the screened bottom board. Honeybee colonies, like all animals, produce debris. The screened bottom board allows much of the debris to fall through to the mite inspection tray underneath the screen. This debris includes varroa mites, which are the bane of beekeeping. Beekeepers can use the mite tray to assess the extent of their mite load. They do this by cleaning the mite tray, spraying it with vegetable oil (to trap the mites) and reinstalling it into the bottom board. After a day or more, they remove the mite tray to count the number of mites on the mite tray. You can get a detailed description of this mite counting method in our Hive Inspection Basics for Northwest Beekeepers field guide.
Entrance Reducer: The entrance reducer sits at the front of the bottom board to control entrance size. This helps control the air circulation in the hive and helps protect the colony from robbing bees, yellow jackets and windy weather. The entrance reducer is useful during “robbing season” (scarce forage leads to bees robbing each other), and essentially minimizes the size of the goal for the defending bees to protect. When you first install your nucleus colony, use the entrance reducer for a few days for added protection as they settle in.
Boxes: Many beginners ask how many boxes should a hive have, and what size? This can be a confusing topic, and there is no hard rule except that the bees need enough expansion space. The exact shape of the space is less important. A nucleus colony will only need one brood box to start out, but after a few weeks will need more room as it expands in population, so the beekeeper will then add a second brood box. The first and second brood boxes make up the “brood chamber’. The brood chamber is the “nest” where the queen lays eggs and the colony attends her and to the bee brood.
If things go well, you might need a third box to house surplus honey that the bees might make during the main nectar flow. This box is called a honey super, and is not normally as tall as the brood boxes, and for good reason. The smaller size makes it easier to handle the box when it is full of surplus honey. However, don’t expect much, if any surplus honey the first year as the bees spend so much energy creating their new home by making thousands of wax cells. To accommodate the above needs, our complete hives come with two brood boxes and one honey super, but you can option down to fewer boxes.
Some beekeepers configure their hives with only a single brood box. This makes for fewer boxes to deal with, and simplifies colony management. However, nothing is free, and the cost is that a strongly expanding colony might decide it is too cramped in a single box and therefore swarm. You can manage this by adding more honey supers and also by removing brood frames to start a new colony (referred to as a “colony split”) and replacing the removed frames with empty ones to create more expansion room. Our complete hives include 2 deep boxes (“brood boxes”) and one medium box (“honey super”). You will start with one deep box for your nucleus colony, and add the second after the colony has expanded to fill around 70% of the first box.
8-Frame vs 10-Frame Hive: We are frequently asked about which is best. The answer is that they are both completely suitable, and neither is intrinsically superior to the other.
In the Western States, roughly 70% of beekeepers use 10-frame boxes, and 30% 8- frame. The difference between the boxes is simple: 10-frame hive boxes hold 10 frames per box, and the 8-frame hive boxes hold 8. Having 10 frames allows the maximum colony expansion room, so allows more room before the colony feels cramped and decides to swarm. On the other hand, 8-frame beekeepers can adjust for this by being more attentive about adding an extra box in a timely manner. The benefit of 8-frame hives is that the boxes are lighter and smaller, so easier to lift. Anyone with a back problem should consider the 8-frame hive.
Frames and Foundation: We recommend one of two other options: (1) a wood frame with a beeswax coated plastic foundation. The manufacturers of such foundations use cappings wax (from the honey super), which is much cleaner. These foundations are very robust and can be cleaned to recycle them in the hive. The foundations we sell have an extra coating of beeswax to help the bees get started. (2) The other alternative is foundationless frames. These are wood frames with a wax starter strip under the top bar of the frame. With luck, the bees take their cue from the starter strip and build comb straight down to fill out the frames. The benefit of foundationless frames is that the comb they build is fresh and not tainted with old brood wax. Better still, you don’t have the bother of installing foundation in the frame. However, it is more fragile than plastic and the bees don't always build the comb straight down. You can manage this by interleaving a foundationless frame between foundation frames. This restricts them from deviating to far horizontally. Foundationless frames are a good alternative to those who don’t like using plastic in the hive. Another issue is that the bees have a tendency to use foundationless frames to build drone comb, rather than worker brood. This is equivalent to manufactured drone comb, and can be utilized as part of a mite management program.
In the honey super, there is another alternative, which is the cut-comb foundationless frame. This comb is designed to provide additional strength to allow it to be spun in a honey extractor. It also provides convenient guides for cutting out comb sections of honey.
Inner cover: The typical inner cover is a framed plywood panel with a center hole that sits atop your upper box, under the outer (telescoping) cover. It keeps the bees from gluing the telescoping lid on with propolis. (If the telescoping lid is glued down, a hive tool cannot pry it off without causing damage.) Our inner cover is taller than most, which makes it more robust and provides some space for dry feeding and treatment. There are several alternatives to an inner cover, from a spacer shim, to a quilt box (Warre Hive) or just a canvas cloth. These all have some benefits, but we prefer the Vivaldi Board.
Vivaldi board: The Vivaldi Board greatly expands on the functionality of the inner cover. It offers three main benefits: ventilation, insulation space, and feeder accommodation. It includes ventilation slots on the front and back, and an additional framed screen that allows for a greater feeding capacity. As a bonus, the Vivaldi Board allows you to non-invasively check on the bees through the Vivaldi Screen without them flying out. For those wondering, it is named after Vivaldi’s Four Seasons (meant to be used on the hive year round).
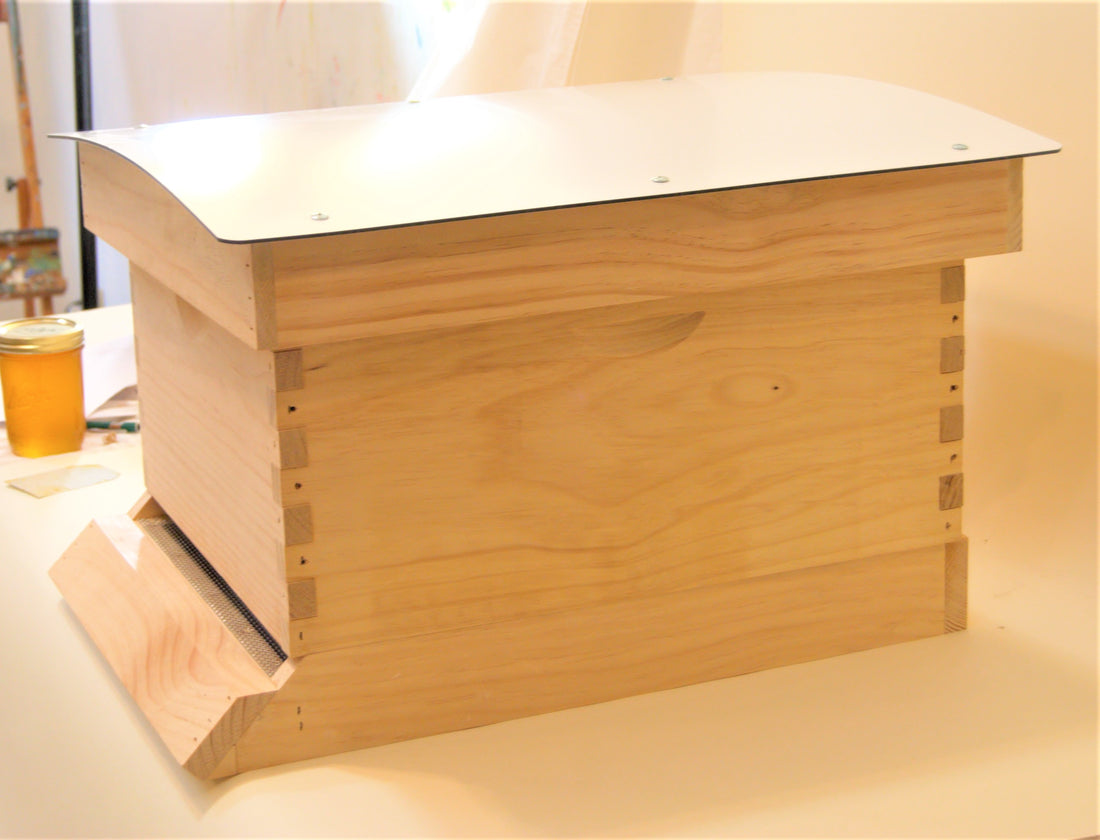
Outer Cover: Migratory lids are the most basic form of outer cover. They are very popular with commercial beekeepers because the lid has a low profile, so allows for more hives to be loaded on a truck. They are a useful standby for hobby beekeepers, particularly on bait hives. By comparison, the Telescoping Cover is much more common among hobby beekeepers. Overall, it does a good job. It does require an inner cover, as described above. One disadvantage of the telescoping cover is the standard plywood panel underneath the metal cover. This panel tends to soak up moisture generated by the bees, which can harbor mold and contribute damp conditions in the hive.
An attractive alternative to the telescoping cover is the Curved Lid. It has a polymetal top, which helps manage the internally generated moisture differently. Any moisture hitting the underside of the polymetal tends to roll to the sides of the lid and drip onto the moisture wick in the Vivaldi Board. The moisture wick can be changed as needed. The curved surface and generous eaves help direct external moisture (rain) away from the hive boxes to the eaves of the lid. In wet climates like ours, this extra protection is nice. As a bonus the curve of the lid creates additional internal space that can be used for feeding, insulation, and ventilation.
PDF Form: Click this link.